Author: jingfei

  • How to switch from UA to GA4 for Fundraise Up ecommerce tracking?

    Many nonprofit organizations and charities use online donation systems to streamline their fundraising efforts. Platforms such as iDonate, GivingFuel and Fundraise Up can bring significant efficiencies for the donation flow. They can also help your organization better understand the donation funnel and the performance of donation campaigns. Ecommerce reports in Google Analytics can be very helpful to get the maximum benefit from these platforms. In this guide, we’ll take one of these platforms (Fundraise Up) as an example, and we’ll show you how to integrate it to your Google Analytics property.

    As you are probably aware, Google Analytics 4 will replace Universal Analytics (UA) very soon (on July 1, 2023). For this reason, we’ll focus on the Google Analytics 4 implementation.

    Step 1: Import the Google Tag Manager (GTM) tags and triggers

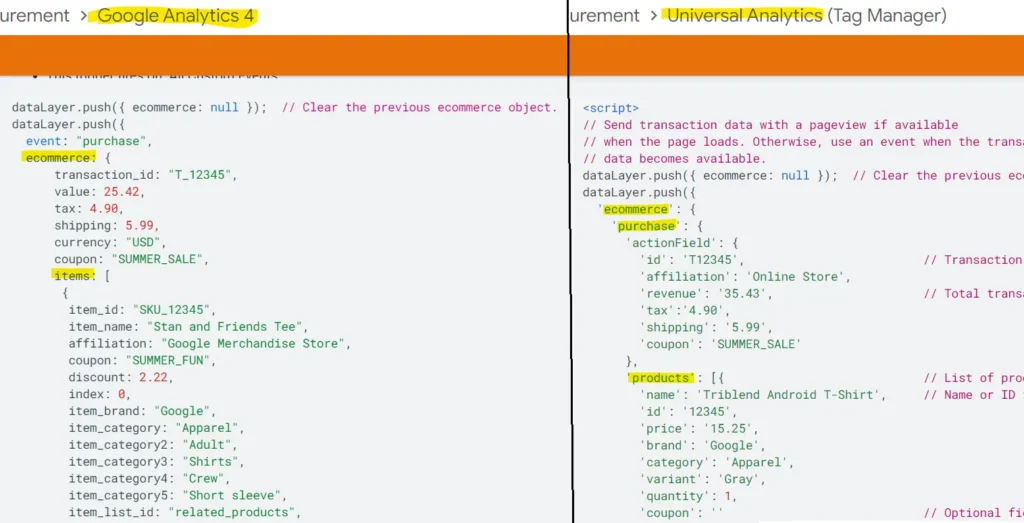
    Fundraise Up provides a handy guide and a GTM container that you can import for sending the key donation events to Google Analytics 4. If you’re still using UA ecommerce tracking, you may consider switching to GA4 ecommerce tracking soon. However, this transition was not very easy for us: Fundraise Up is still pushing the ecommerce dataLayer events following the UA schema, which is quite different from GA4 format. You can see the differences in the side-by-side comparison below.

    09_01

    But don’t worry, we can still do the switch by creating a custom HTML tag in Google Tag Manager.

    Step 2: Preparing our donation data

    For this step, let’s use the purchase event as an example. First, create a trigger using the event in the imported container called “FundraiseUp.checkoutClose”. We chose this event as our trigger since it fires after the purchase completes, so that we can get the purchase amount and currency value.

    09_02

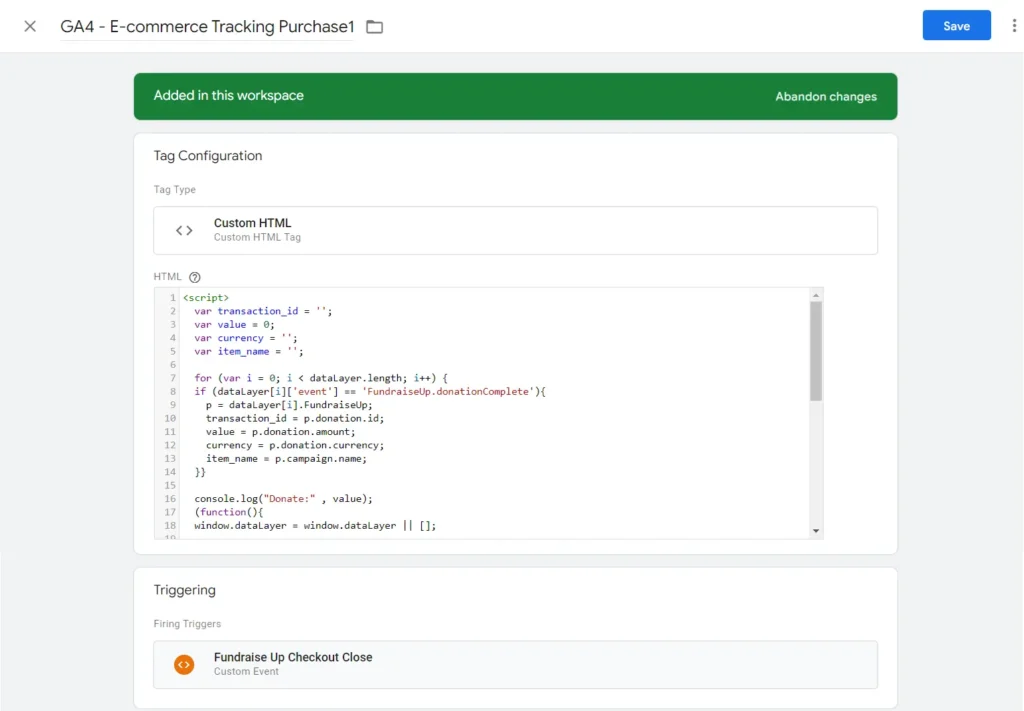
    Then we need to create a Custom HTML tag to prepare the ecommerce data for GA4. We named it “GA4 – E-commerce Tracking Purchase1”, but of course you can use any other name you’d like in GTM. What the code below does is collect the values we need from the “donationComplete” event, clear the existing UA format “purchase” event, then send a new “purchase” event following the GA4 schema. Here’s the HTML code for this custom tag:

    <script>var transaction_id =”;var value =0;var currency =”;var item_name =”;for(var i =0; i < dataLayer.length; i++){if(dataLayer[i][‘event’]==’FundraiseUp.donationComplete’){ p = dataLayer[i].FundraiseUp; transaction_id = p.donation.id; value = p.donation.amount; currency = p.donation.currency; item_name = p.campaign.name;}}(function(){ window.dataLayer = window.dataLayer ||[]; window.dataLayer.push({ ecommerce:null});// Clear the previous ecommerce object. window.dataLayer.push({ event:”purchase”, ecommerce:{ transaction_id: transaction_id, value: value, currency: currency, items:[{ item_name: item_name, price: value, quantity:1}]}});})();</script>

    09_03

    This new tag should use “Fundraise Up Checkout Close” as its trigger.

    Step3: Sending the ecommerce data to GA4

    Now the first tag has pushed the GA4 purchase event, we need a second tag to send this ecommerce event to the GA4 container.

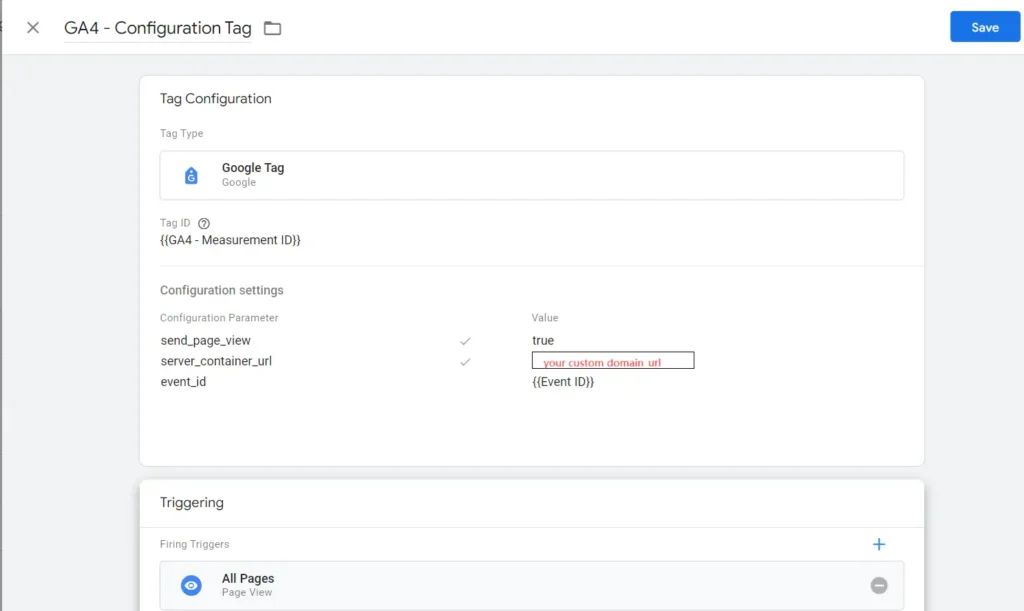
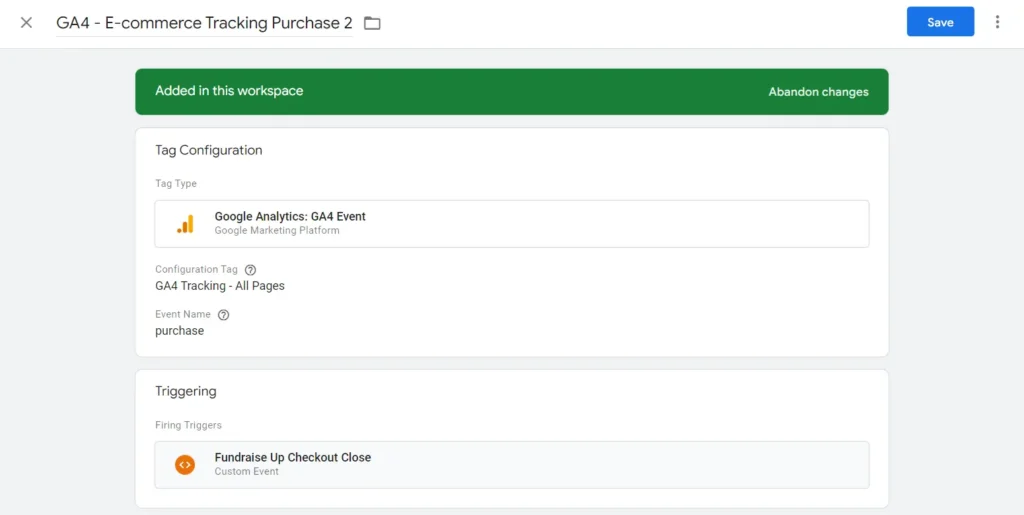
    The second tag will use the same trigger as the first one. We set the tag type to “GA4 Event”, choose the Google Analytics: GA4 Configuration tag for your GA4 property, and the event name should be “purchase”.

    09_04

    Step 4: Testing the GTM setup

    Now comes the fun part: testing. Using Fundraise Up’s test environment, you can make donations and see if the tags are working as expected.

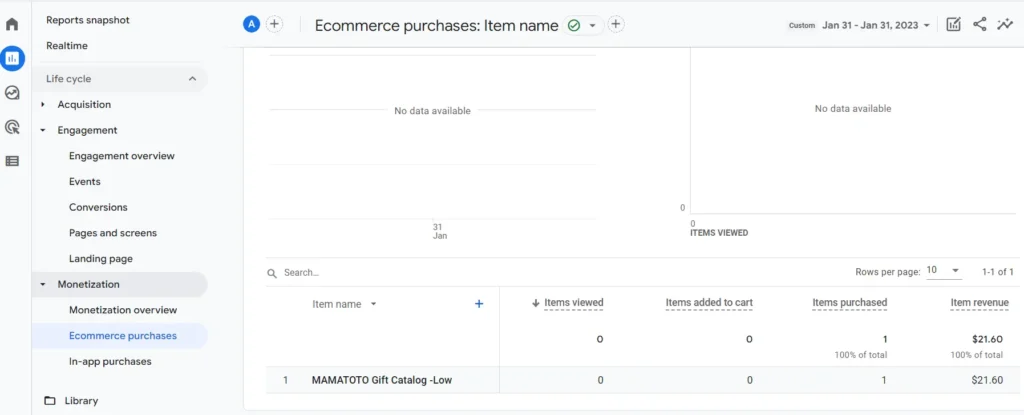
    Unfortunately, it takes up to 24-48 hours for the transactions to appear in GA4’s “Ecommerce purchase” report. However, you can use the real-time preview and make sure that the purchase event is sending the required parameter values such as currency to GA4. If you see these in the real-time preview, you are very close to finishing the implementation.

    09_05

    There are other ecommerce events such as select an item from a list, add/remove product from shopping cart, etc. Those all can be tracked in GA4 using a similar method above.

    It’s quite likely that Fundraise Up will update their code to send proper GA4 ecommerce tracking events sooner or later. But in the meantime, we hope this article will help you with your GA4 migration.

    At Plumfind, we love solving measurement challenges using Google Analytics and Google Tag Manager. If you have another problem that you are facing, please get in touch and let us know. If you have a better solution for the implementation we shared above, please let us know as well. We’re always happy to learn from our community.

    About the author(s):

    Sample avatar image. Jingfei Gao

    Jingfei is our software engineer. She can magically convert our craziest ideas into well-optimized chunks of code. Her unbounded energy and can-do attitude keep our technical teams running like a well-oiled machine. We suspect that the source of her energy is the classics: she loves opera, her favorite composer is Mozart and in another life, she could have easily been an archeologist. She lives in Montreal, Canada.

  • Plumfind Presents: Customizing Your Shopify Store With These Easy Examples

    We love Shopify: it’s a versatile ecommerce platform that enables users to build impressive online stores with its point and click interface. However, sooner or later, you may realize that you need finer control and some customization. These changes could be some visual enhancements to your store or some functional elements to add new features. This is where most merchants get stuck: when they open the liquid theme files, they feel overwhelmed and decide not to touch anything for the fear of breaking their store. Have no fear! Pumfind is here to help. Let’s take a look at some examples together.

    How to experiment safely in the Shopify environment

    Before you make any changes to your store, let’s make sure that you can try any change you would like to test without worrying about the stability of your store. The best practice for this is to “backup early and backup often”.

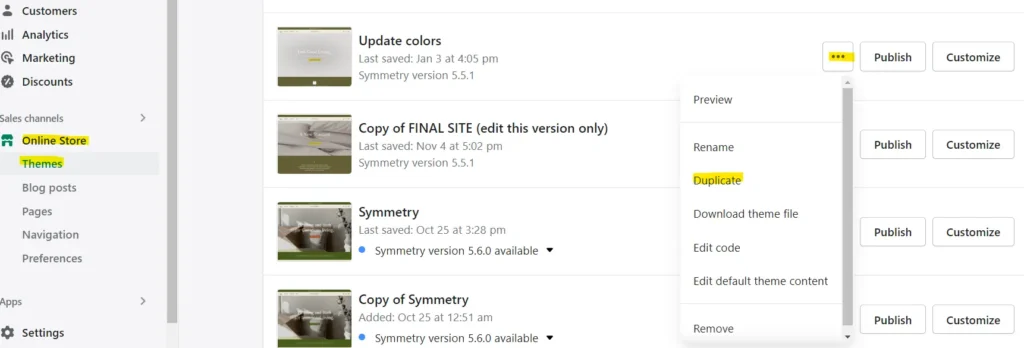
    Shopify doesn’t include a default feature to roll back the changes made to a template in the dashboard panel. Therefore, we recommend creating a copy of the current version every time before making any changes. You can easily do that by going to “Online Store”->”Themes”->click “…” beside the theme that you want to copy, then choose “Duplicate”.

    Don’t forget to rename the new copy with the changes you are going to make. For example, “update theme color”, “add new product”, etc. Once you finish editing the template or the code, you can preview the changes then publish the new copy, the updates will be immediately shown in your store.

    \"08_01\"

    Two other best practices to give you peace of mind:

    • Test incrementally: make sure that you test your changes in a systematic way. Quickly test your changes before you finalize them.
    • Document all the changes you have made in a store configuration document. You may quickly forget how or why you made some changes. This document can help you review or reuse some settings or code snippets months or years later.

    How to quickly create scrolling text in your Shopify store

    It is very simple to add a scrolling heading or banner by using the html element <marquee>, which is used to insert a piece of scrolling text. For example, if you want the text scroll from right to left, the html code would be: &lt;marquee width=\”100%\” direction=\”left\”&gt; TEXT &lt;/marquee&gt;

    In Shopify, this scrolling effect is commonly used to create a promo banner or a shipping bar on top of the website store page (e.g., “Free shipping on all orders over $50!”). Whenever we want a certain text to have a scrolling effect, we just need to add the code above to the corresponding liquid file.

    Suppose we want to make the announcement bar on top scrolling from right to left, we start with finding the liquid file we need.

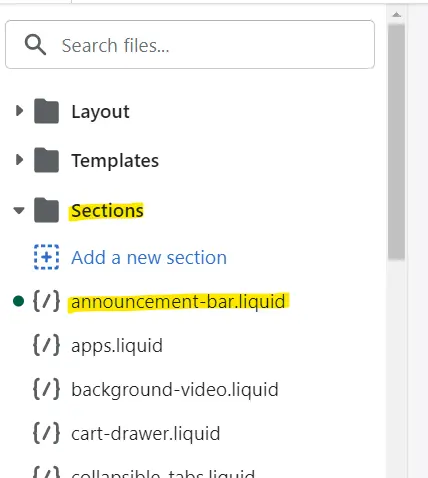
    First we access the code: go to the Shopify dashboard -> online store -> click “…” of the current template -> edit code. Since we want to change the announcement bar section, we go to “announcement-bar.liquid” under “Sections” file.

    \"08_02\"

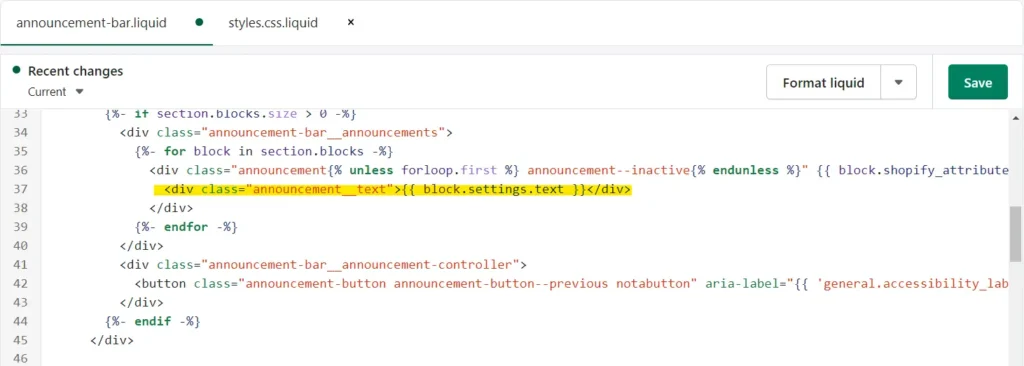
    Next, we find the code that contains announcement text.

    \"08_03\"

    In this example, line 37 contains the code for announcement input text. We can replace this line with:&lt;marquee width=”100%” direction=”left”&gt;{{ block.settings.text }}&lt;/marquee&gt;

    Now whatever we put in the announcement bar will be scrolling as we wanted.

    Experimentation is the key here. Don’t hesitate to try different settings, for example for the “direction” attribute, you can try using “right” instead of “left” and see if you prefer that version.

    How to implement the typewriter effect to a heading in Shopify store

    Themes compatible with Shopify 2.0 allow us to add html code directly in the theme customization page. Thanks to this feature, we can easily create headings with different animation effects. In this example, we’ll also show you how to edit a CSS file to achieve the perfect look and feel for your store.

    Here is an example of adding a typewriter effect to the heading:

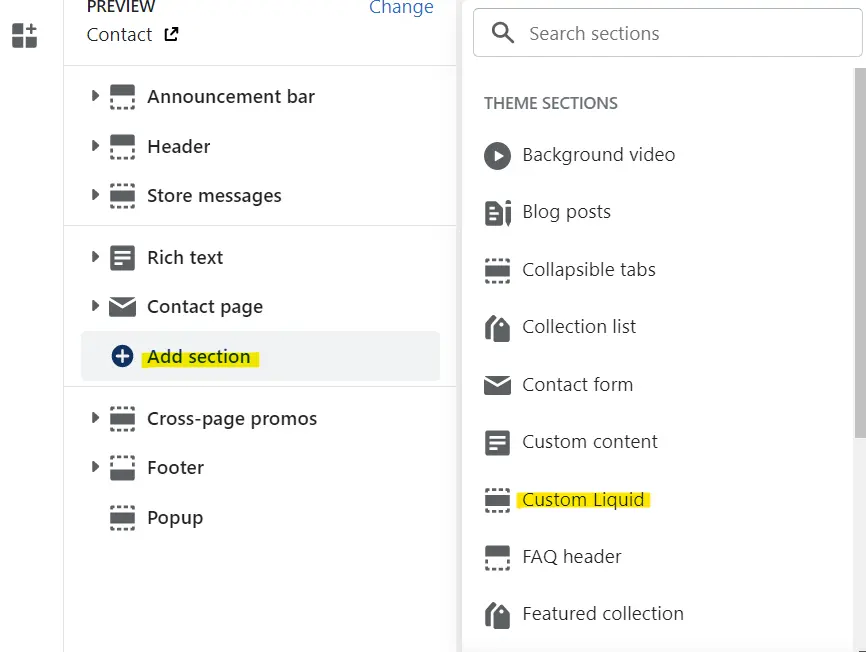
    Click the “Customize” button of the theme you want to edit.

    If you have ever edited store pages, you may see the “Add section” option before. Click it and select “Custom Liquid”.

    \"08_04\"

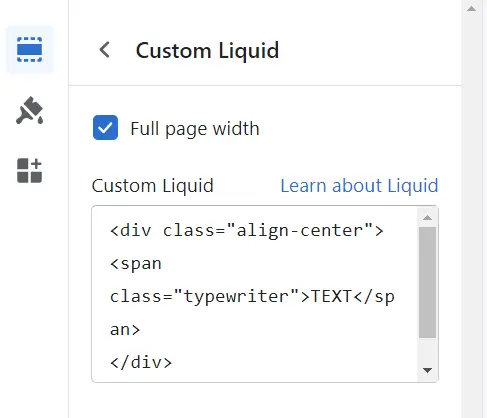
    Then copy and paste html code below to the custom liquid input box (Replace “TEXT” with your own heading):&lt;div class=”align-center”&gt; &lt;span class=”typewriter”&gt;TEXT&lt;/span&gt; &lt;/div&gt;

    \"08_05\"

    If your heading has multiple lines, then you can use the <br> element to separate them.

    For example:&lt;div class=”align-center”&gt; &lt;span class=”typewriter”&gt;LINE1 &lt;br&gt; LINE2 &lt;/span&gt; &lt;/div&gt;

    After creating the new section, you can drag and move it to the place you want.

    You may notice there is an element class attribute called “typewriter”. The last step is adding the CSS code of that “typewriter” class.

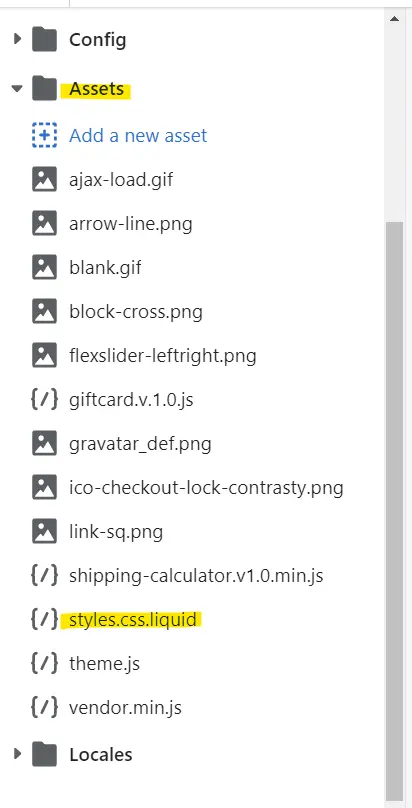
    Go to the Shopify dashboard -> online store -> click “…” beside the template -> edit code.

    \"08_06\"

    Under folder “Assets”, open the “styles.css.liquid” file and paste the code below.

    .typewriter {
    color:#0000;
    background:
    linear-gradient(-90deg,#deefec 5px,#0000 0) 10px 0,
    linear-gradient(#444463 0 0) 0 0;
    background-size:calc(var(–n)*1ch) 200%;
    -webkit-background-clip:padding-box,text;
    background-clip:padding-box,text;
    background-repeat:no-repeat;
    animation:
    b .7s infinite steps(1),
    t calc(var(–n)*.2s) steps(var(–n)) forwards;
    }
    @keyframes t{
    from {background-size:0 200%}
    }
    @keyframes b{
    50% {background-position:0 -100%,0 0}
    }

    The highlighted “#deefec” is the background color HEX number, and the “#444463” is the text color code. You can adjust them based on your needs.

    Time to get creative!

    When it comes to Shopify development, it’s perfectly normal to feel a bit confused at the beginning. We hope that the practical examples we gave above will be useful in your learning journey. Once you implement a couple changes you will feel a lot more confident in your abilities and you’ll feel more motivated to try new changes.

    The team at Plumfind is here to help if you have any specific questions or requests. Feel free to get in touch with us. We’d love to hear from you.

    About the author(s):

    Sample avatar image. Jingfei Gao

    Jingfei is our software engineer. She can magically convert our craziest ideas into well-optimized chunks of code. Her unbounded energy and can-do attitude keep our technical teams running like a well-oiled machine. We suspect that the source of her energy is the classics: she loves opera, her favorite composer is Mozart and in another life, she could have easily been an archeologist. She lives in Montreal, Canada.

  • How to Set up Meta’s Conversions API Tracking

    In May 2011, EU countries adopted the EU Cookie Law (ePrivacy Directive), which requires websites to get consent before storing cookies on users’ devices. Other jurisdictions such as California introduced similar laws. Today, ensuring user privacy and enabling cookie consent are becoming increasingly challenging tasks for marketing teams around the world.

    What is a cookie anyway?

    A cookie is a simple text file that is placed on a user’s device to enhance the user experience and help measure user interactions over time. Cookie files typically include unique codes that help servers identify individual users. This has many practical uses, such as shopping carts that remember your items. Cookies also help marketers gain access to valuable user engagement information.

    All these new laws governing the use of cookies triggered an avalanche of cookie consent banners. These banners are everywhere now and they give users the option to accept or reject having their personal data collected. Many website visitors simply ignore cookie banners, or reject cookies. As a result, websites can no longer send the required information for marketing analytics using tools such as Google Tag Manager or custom pixels. This has a direct impact on data availability in Google Analytics. Ecommerce reports, attribution reports and many other user engagement reports will have gaps.

    One potential solution is to bypass the user’s device entirely and send the relevant data from the transaction server to the analytics server. For example, if a user just filled a reservation form, the server that processes the form can send this user engagement event directly to a server side GTM container, or to another server. Meta’s Conversions API is exactly this: a dedicated server that is ready to receive the relevant user engagement information. As Meta’s Conversions API receives the data directly from the transaction server, the end user’s cookie consent will not limit gathering marketing analytics data. Of course, we still need to follow all the best practices to protect user privacy and confidentiality during this transmission.

    Setting up Meta’s Conversions API

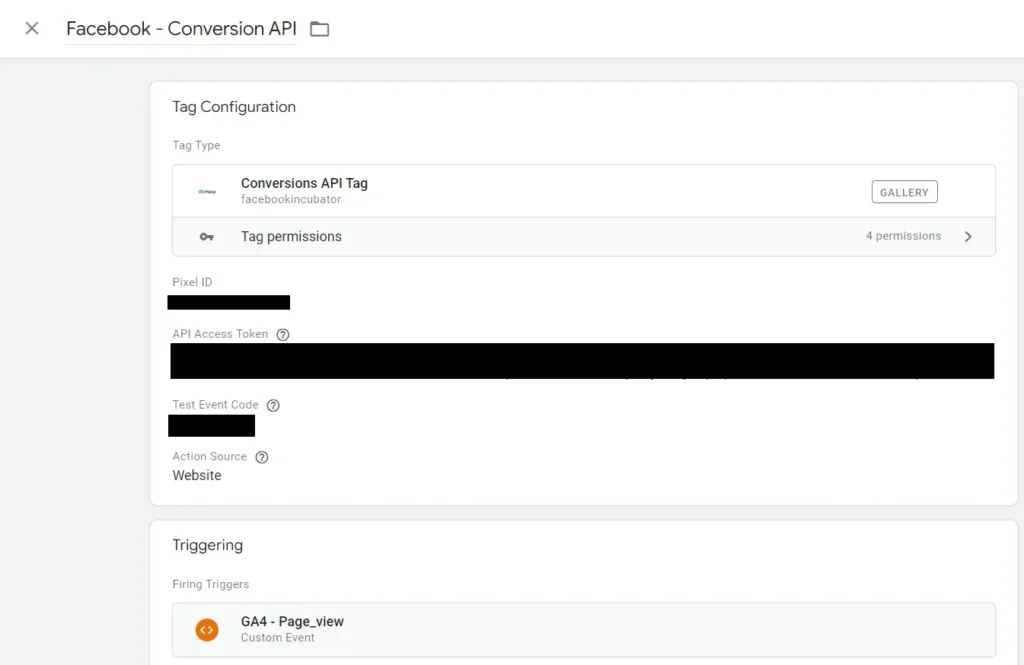
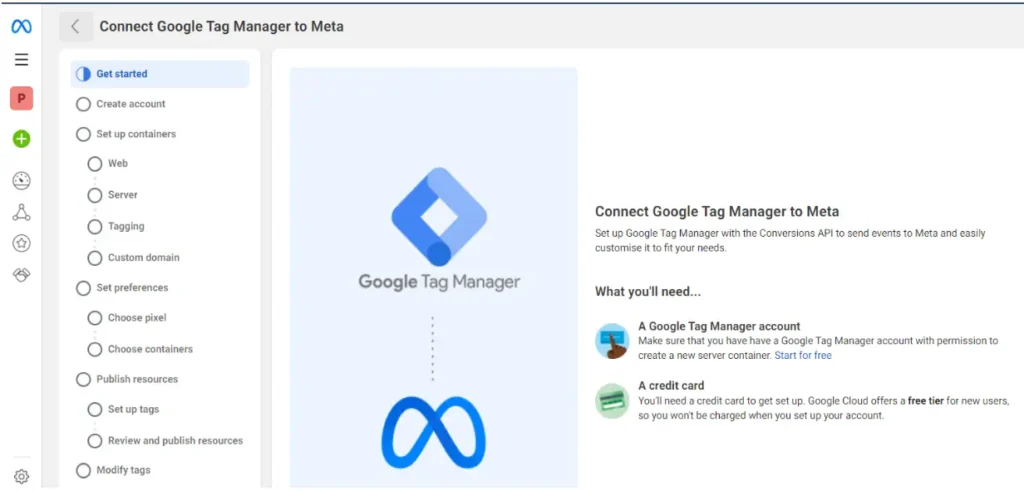
    In this section, we will explain how to set up Meta’s Conversions API using a server side GTM container and Google Cloud.

    1. Create a server side GTM container and provision of tagging server.
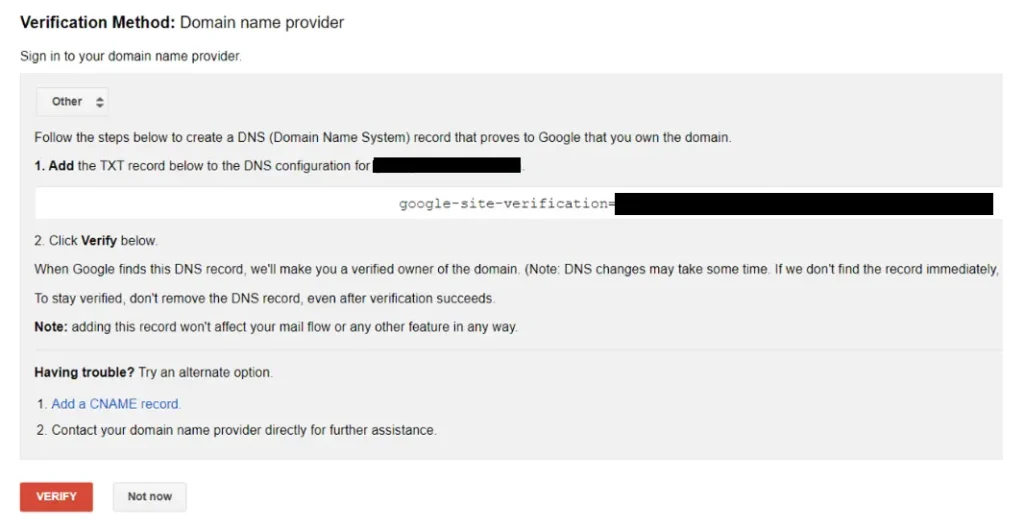
    2. Configure A DNS server
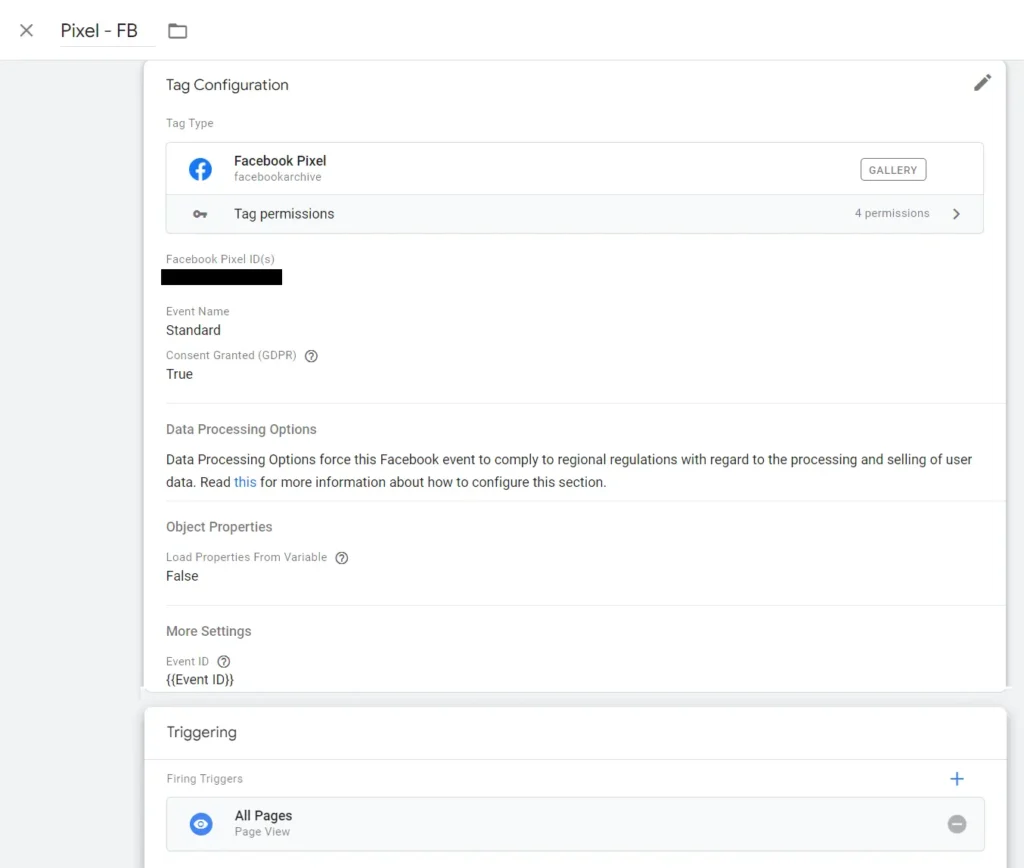
    3. Configure Server Side GTM and Client Side GTM containers

    Help is on the way!

    If any of the steps above seem confusing or difficult to implement, don’t worry. Our team of experts is here to help! Just get in touch with our support team support@plumfind.com and let us help you get back on track.

    About the author(s):

    Sample avatar image. Jingfei Gao

    Jingfei is our software engineer. She can magically convert our craziest ideas into well-optimized chunks of code. Her unbounded energy and can-do attitude keep our technical teams running like a well-oiled machine. We suspect that the source of her energy is the classics: she loves opera, her favorite composer is Mozart and in another life, she could have easily been an archeologist. She lives in Montreal, Canada.
  • How to Implement Google Tag Manager for Single-Page Application such as React

    We love single-page applications: they can be incredibly fast and offer a wonderful user experience. As developers, we love challenges, but one thing we didn’t see coming was the difficulty of Google Tag Manager with React applications. Here’s a quick guide on configuring your tags and triggers, hopefully it will save you some time. Spoiler alert: our solution is based on the “Custom Event” trigger in Google Tag Manager.

    Your step-by-step implementation guide

    Step 1: Installing GTM

    We will start with installing an essential Javascript module called “react-gtm-module”. Go to your React based app project directory; enter “npm install react-gtm-module-save” in the terminal and install the GTM module for React based apps. If you haven’t used package managers before, check out this link.

    Step 2: Configure your index.js file

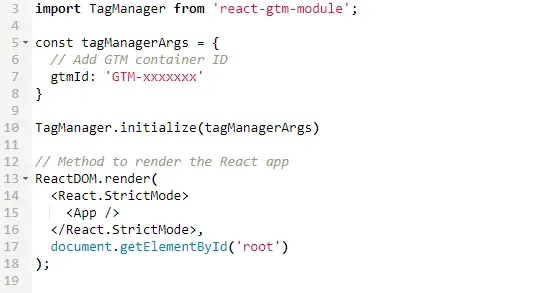
    Next, you should insert the statement “import TagManager from ‘react-gtm-module’”in your “index.js” file which allows your app to initialize the Google Tag Manager module that we installed in the first step. Below the import code line insert a code snippet right above the ReactDOM.render section (as shown below) and don’t forget to replace ‘GTM-XXXXXXX’ with your own app’s GMT Container ID:

    01_01

    Once you complete this step, your Google Tag Manager is able to track pageviews on all your app pages. You may say “This sounds great! We’re all done here.”, but unfortunately, this basic configuration is not enough. You still need to customize the tags and triggers for pageviews and events in your app.

    Step 3: Tracking pageviews and specific events

    The default GTM pageview trigger is fired only on page load. It won’t fire again unless you refresh the page. This is because React renders each page component separately: switching between different pages means re-rendering some of the React components, instead of reloading the whole page.

    If you would like to track all the “history” of users, please read the section on “How to track pageviews”. If you’re interested in tracking specific events, such as button or link clicks, please refer to the section on “How to track specific event(s)”.

    How to track specific event(s):

    To track a button click or a link in your app, go to your code where you add the button. In the “ onClick ” method, use the window.dataLayer.push command to send your custom event to a GTM datalayer (if you’re new to datalayers, here’s a good explanation from Google). Here’s a code snippet that can help you. Just replace ‘buyNow’or ‘button-click’ with your own event name that matches your GTM trigger configuration:

    01_02

    Of course you can customize the “Category”, “Action” and “Label” fields to match your needs. we just used the button name here.

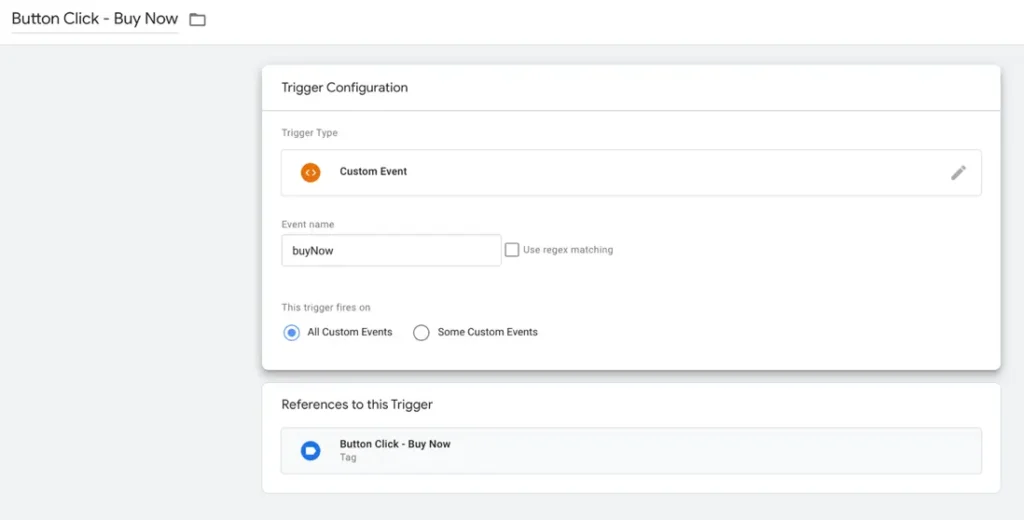
    To set up the corresponding trigger, please see below screenshot for an example:

    01_04

    Again, you should customize the “Event name” field, but you need to make sure that it is identical to the event name that you added to the “onClick” method in the code snippet.

    01_02

    Pro tip: “The value of the event variable in your onClick method must match the name of your GTM trigger.”

    How to track history pageviews on all pages:

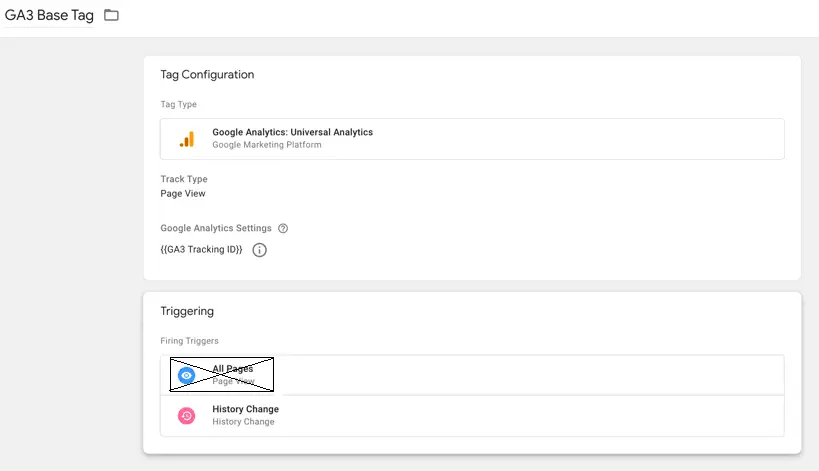
    Normally, tracking pageviews is one of the easiest things to do in GTM. Add a base tag for Google Analytics, pair it with an “All Pages” trigger, and you’re done. However, React and other single-page applications require a bit more work. To track pageviews, you can use the “History Change” trigger.

    01_05

    You can select any tag name you’d like, but make sure that the Google Analytics Settings variable matches the GA3 or GA4 Tracking ID of your own app project. Please note that, if you use the “All Pages” trigger, the trigger will only fire once, unless users refresh the page. That’s why we use the “History Change” trigger instead.

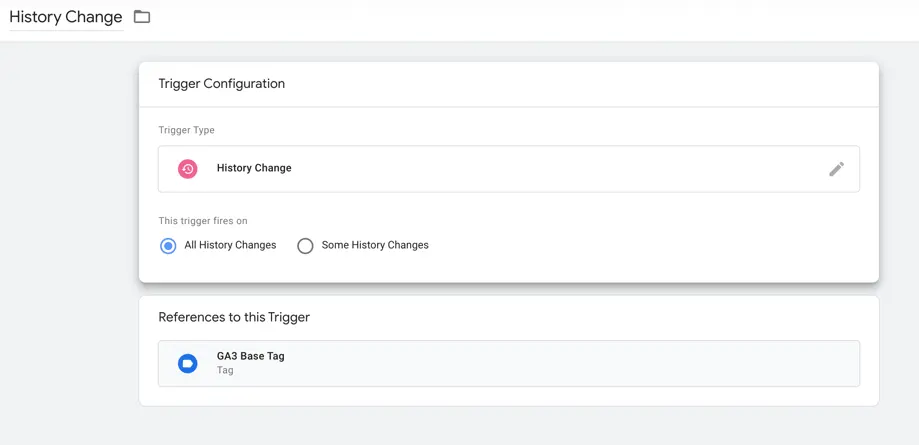
    To set up the corresponding trigger you can use the configuration below:

    01_06

    How to track a specified page:

    To track the pageviews of specified pages, you can configure the tag and trigger in a similar way as you did to track pageviews on all pages.

    01_07

    Here’s an example of the trigger configuration:

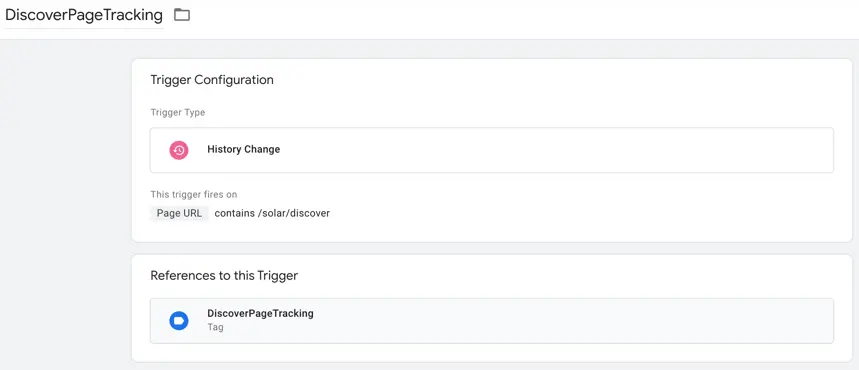
    01_08

    Here we use “This trigger fires on” “Page URL” “contains” “/solar/discover” to track visit history of the page that has “/solar/discover” in the URL path. Just change the path to match the URL of a specific page on your website if you’d like the tag to fire only on that page.

    Congratulations! You now have a robust and easy way to use GTM in your single-page applications. If you found this guide useful, please share Plumfind Academy with your friends and colleagues. S ign up to our “Plum Friends” emails for more tips, guides and best practices on analytics. Thanks for reading!

    About the author(s):

    Sample avatar image. Jingfei Gao

    Jingfei is our software engineer. She can magically convert our craziest ideas into well-optimized chunks of code. Her unbounded energy and can-do attitude keep our technical teams running like a well-oiled machine. We suspect that the source of her energy is the classics: she loves opera, her favorite composer is Mozart and in another life, she could have easily been an archeologist. She lives in Montreal, Canada.
    Sample avatar image. Sasa Zhang

    Sasa is our software engineer, but she does so much more than coding. With a double major in computer science and business, she can connect all the dots and bits that lead to an amazing user experience. Software is not her only passion, mind you. She is an avid pastry chef and a keen hiker. She lives in Montreal, Canada.